
DOOMHouse: 3D game render engine in pure ClickHouse SQL
How my X-mas vacation got DOOMed trying to push coding agents to the limit.

TLDR;
This is a 3D game render engine where all rendering is done in pure ClickHouse SQL.
It demonstrates that the current generation of frontier models can write complex, non-trivial and highly optimised SQL using an iterative optimisation process and that visual debugging essentially works like magic.
Intro
As LLMs have become increasingly better at coding - in particular, paired with an agentic approach - it is time to test them out doing something a bit more non-trivial, like building a DOOM-like 3D game render engine in… ClickHouse.
The purposes of this project are multiple:
Act as a playground for experimenting with agentic coding, using frontier models to solve highly complex and non-trivial tasks.
As a proof-of-concept, demonstrating that modern analytical databases like ClickHouse are powerful enough to handle complex, non-traditional computational tasks — specifically, real-time 3D graphics generation.
As a fun way to learn about and experiment with advanced ClickHouse concepts (gamified learning).
This project is inspired by other notable attempts to build DOOM-like games in SQL. However, it solely implements the 3D render engine and not a full gameplay with monsters, etc. To me, the rendering part is the most fun, and compromises on the graphics quality would likely be needed in an attempt to implement a full game.
The GitHub repository can be found here.
Initial Experimentation
I typically review the current top 10 programming models on OpenRouter to inform myself about what could be worth trying out. However, based on my previous experience so far, Gemini 3.0 seems to be leading when it comes to physics understanding and visual debugging. Opus 4.5 seems to be, overall, a better coding model and currently leads in OpenRouters ranking - but it is prohibitively expensive, as I route almost all my LLM calls through OpenRouter (paying the actual price, not the VC subsidised prices you get in eg Claude Code).
From doing initial experiments, I ended up with:
Gemini 3.0 Pro Preview (G3P) for heavy lifting SQL generation, optimisation, and visual debugging for the render engine.
Gemini 3.0 Flash Preview (G3F) for less demanding SQL and debugging, and for writing the Python client. In particular, Flash appears to be much better at tool usage than G3P. The pricing of this model is also quite competitive.
ChatGPT 5.2 (CG52) for the texture maps. I found it to be significantly better than, e.g., Nano Banana Pro.
For the agent harness, I use Kilo Code in VS Code.
The Process (Simplified)
Ever since I read this blog post, I’ve been wondering what other types of projections could be done in ClickHouse SQL. So I used it as input to the initial prompt, using Gemini 3.0 Pro:
Optimise this prompt:
Make a plan for making a very simple DOOM-like game in ClickHouse SQL. The game needs to be able to render an image like the one attached as output of a SQL query. Consider using an approach for generating images described here
https://clickhouse.com/blog/interactive-visualization-analytics-adsb-flight-data-with-clickhouse
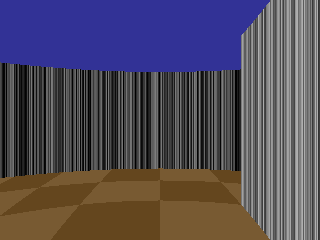
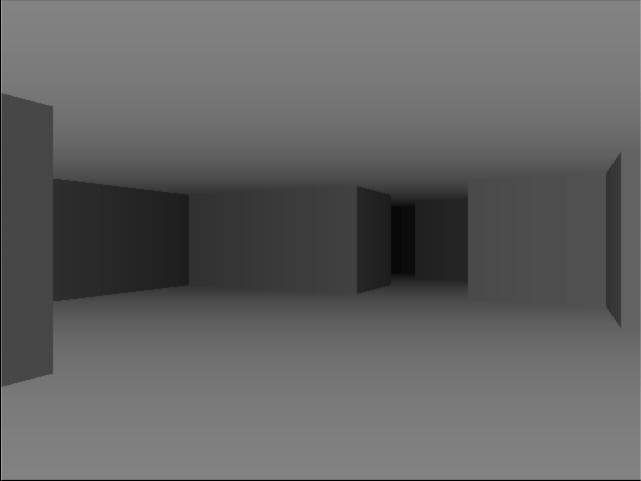
From the optimised version of this prompt, an initial plan was created and implemented. After some debugging, this became the initial version of the render with procedurally generated textures in 320x240 resolution:
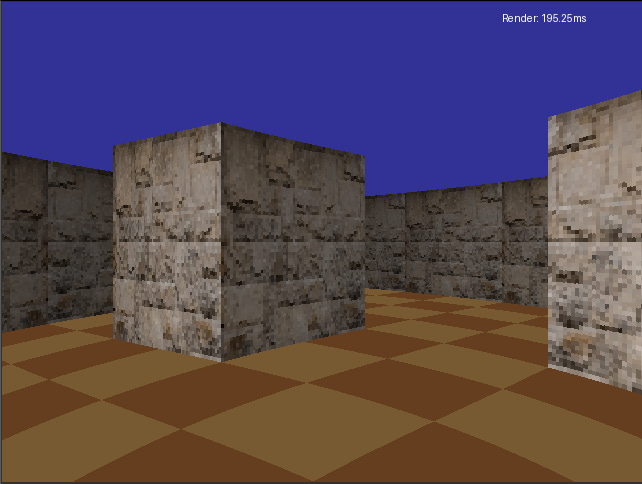
From here on, it’s an iterative process of adding features and optimising the SQL. First, let’s increase the resolution to 640x480, add texture maps from an image for the walls and a simple lighting model, which makes distant walls look darker, to give an impression of depth:
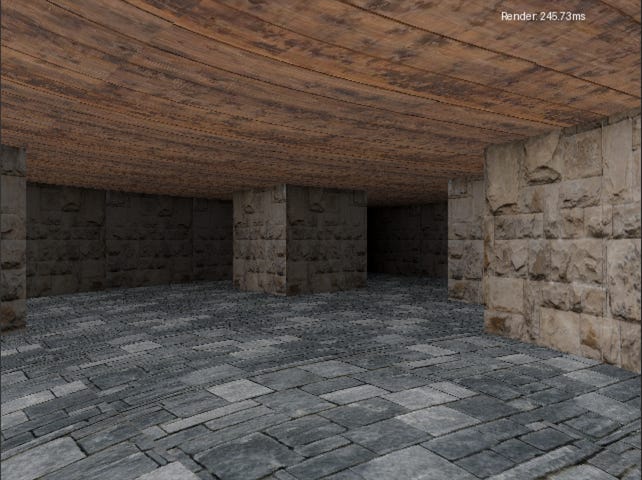
Then, texture maps for the ceiling and floor and increase texture map resolution to 512x512:
The effect of the lighting model is clearer when only using a grey texture map:
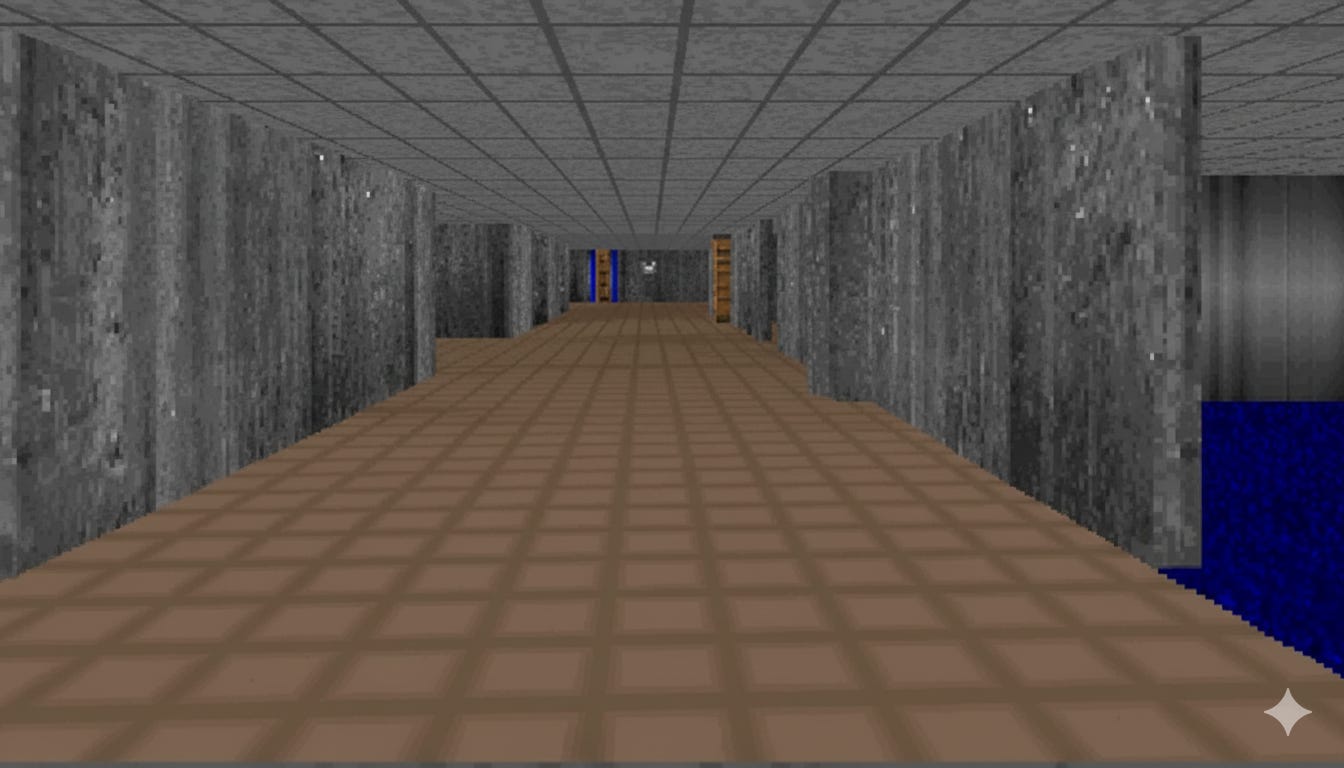
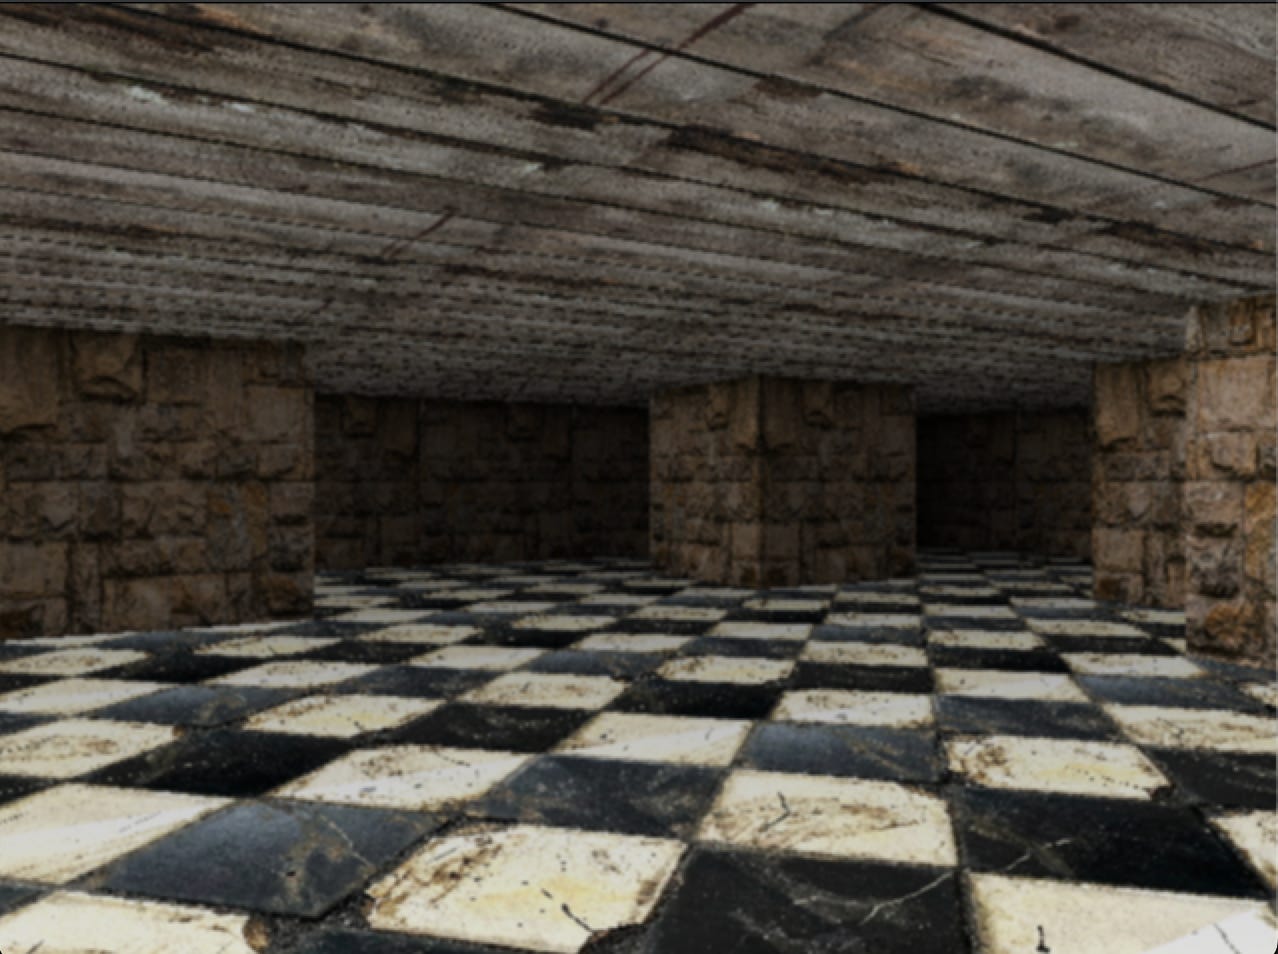
Then use ChatGPT 5.2 to create better texture maps to improve the visual aesthetics of an old, abandoned basement. And top it up with a post-processing step that applies anti-aliasing. Then, finally, fix the “fish-eye” effect that was quite visible in the previous images, and we have a 3D engine that can render this:
And we’re done…but not so fast, because each of these steps included adding the feature to the ever more complex SQL render, running multiple optimisation rounds and fixing any visual artefacts introduced in the process.
The Iterative Optimisation Process
The first type of optimisation was to ask the agent to optimise the render engine, using Gemini 3.0 Pro as the model:
→ Ask the agent to optimise the SQL render pipeline
→ Debug the resulting syntax errors
→ Visually debug any introduced artefacts
→ Measure performance
While this could potentially be fully automated, I did run a task per step manually.
A successful round would be a round that led to a measurably faster pipeline.
This was to test if the agent/model was capable of doing optimisation without any inputs.
Notable optimisations by this approach:
Creating lookup tables with precomputed values (for distance calculations)
Make sure calculations are not calculated multiple times per ray
Optimising the usage of ClickHouse array functions
The second type of optimisation is similar, but with specific inputs on what to do to achieve the optimisation. This obviously requires that you have an idea about how and what to optimise, but since the implementation is so easy, I played around with a lot of concepts. Most notable results:
Using dictionaries for lookups
Using raw bytes output instead of the initially proposed PIL format
Split the render pipeline into 4 renders that each render a quarter of the screen in parallel (4 renders seems to be the optimal with Mac M1 Pro’s 8 cores).
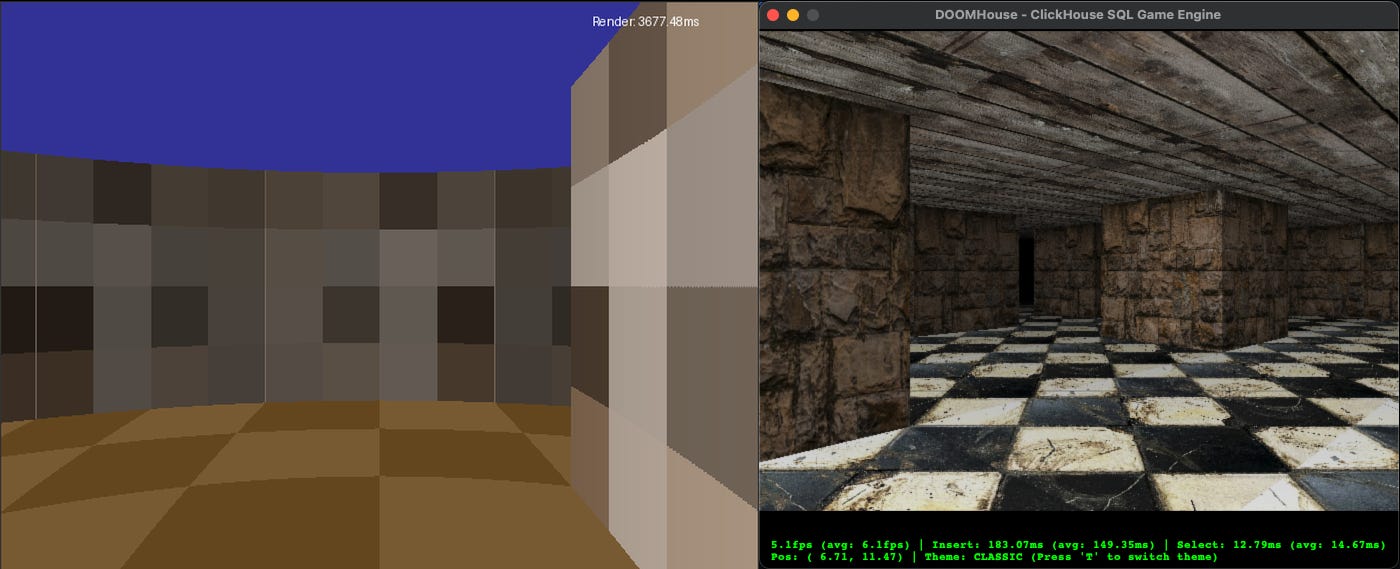
In combination, these optimisations improved the average render time from an initial ~3700 ms to ~160 ms (equivalent to ~6.2 frames per second) on my Mac M1 Pro running ClickHouse 26.1.1.562, while at the same time adding much better graphics:
Visual Debugging with screenshots as inputs
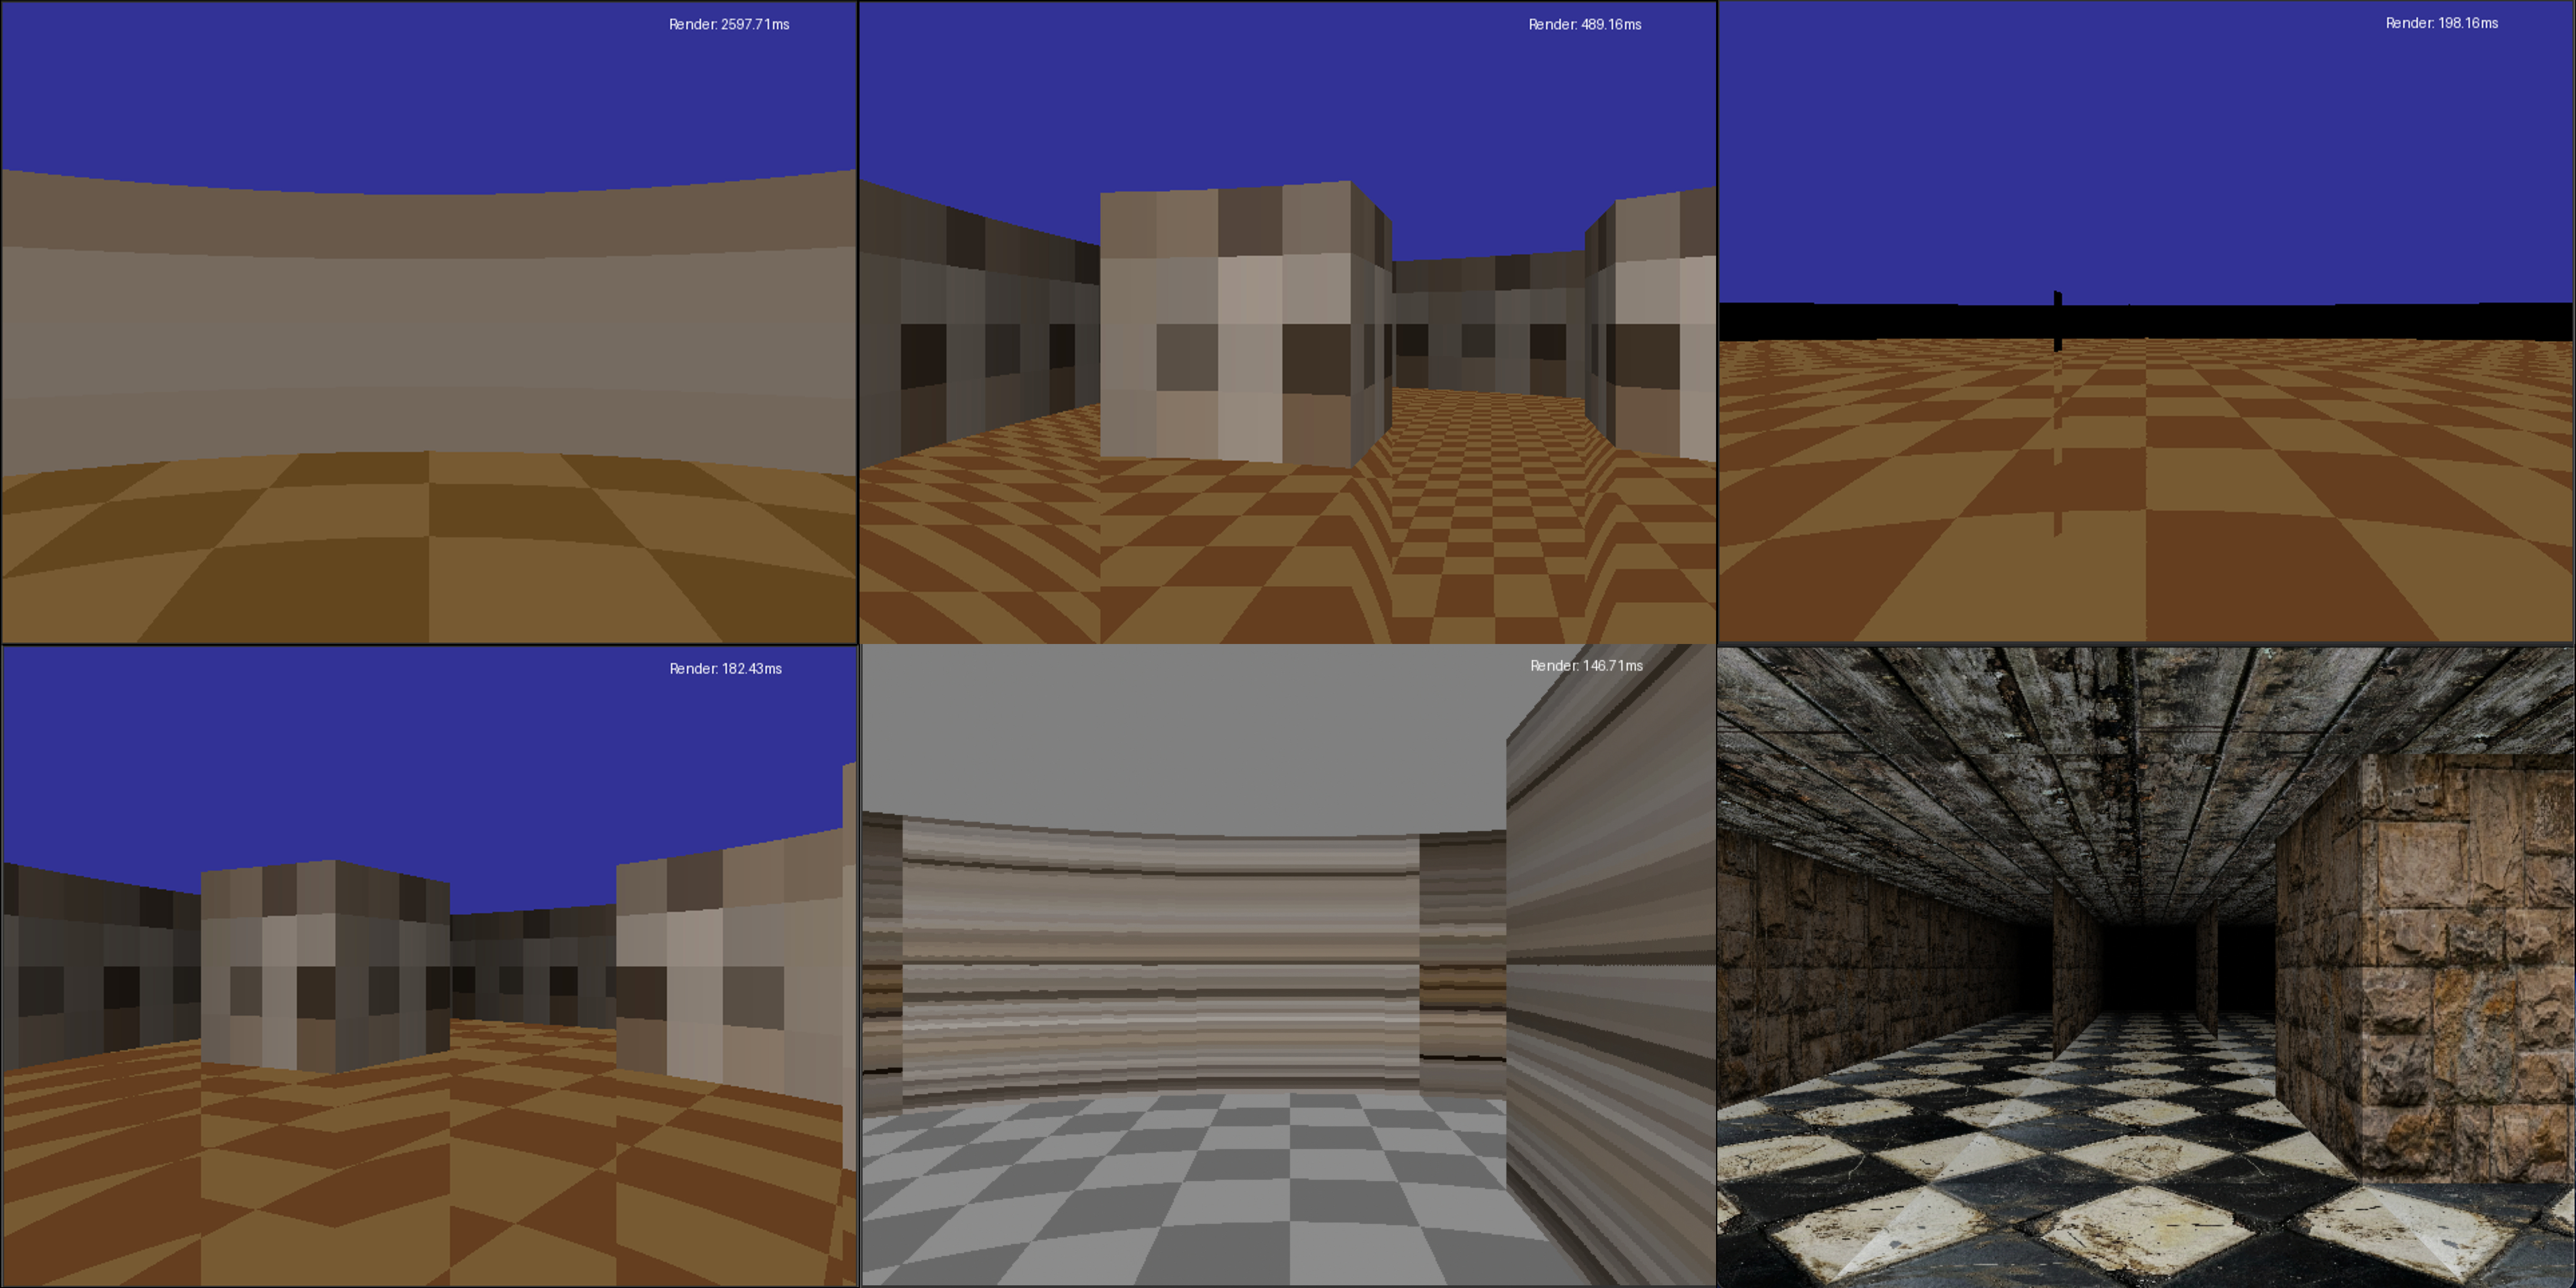
This still feels like straight-out dark magic to me. Quite a few times, artefacts was introduced by adding more complexity or by the optimisation process. In each of these examples, Gemini 3.0 Pro managed to fix it in one shot by analysing the output image, the expected image and the code changes:
This is one of the real powers of multimodal models, and something I plan to explore more in the future, e.g., by automating the visual debugger pipeline.
Having described the proceses we can now jump to the technical part.
How the Agents and I Put it Together
The final architecture that evolved consists of a table to keep track of the player’s position, where an insert triggers a materialised view for the rendering. This view stores the output in a temporary table buffer that triggers a post-processing materialized view which writes to the final frame buffer table. The rendering is split into 4 parallel render pipelines to further optimise the frame rate.
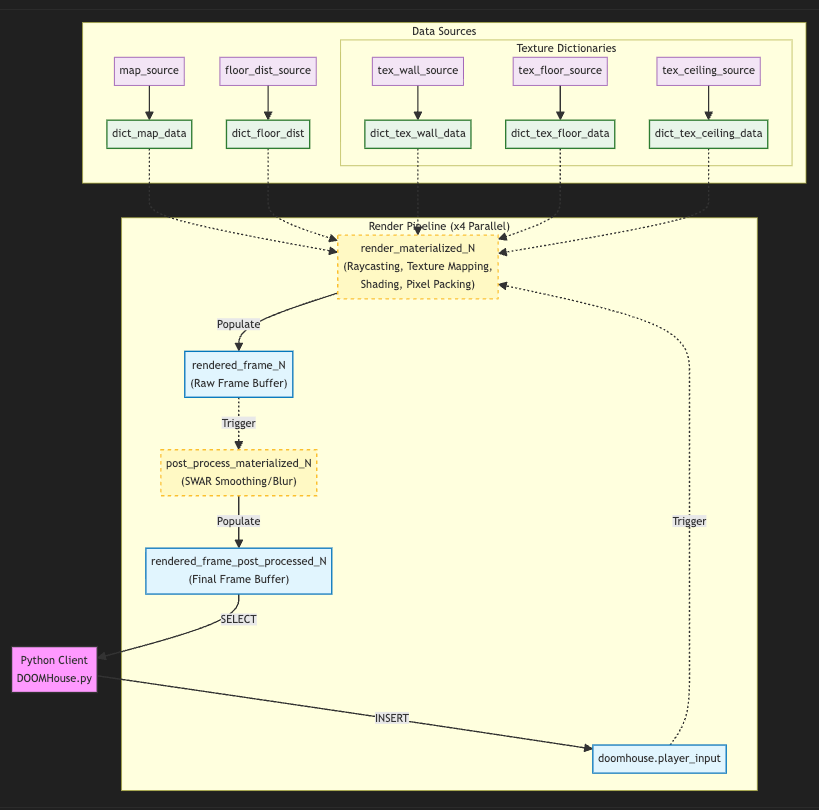
A lightweight Python client inserts positions based on key presses into the player input table and selects from the final frame buffer. It also initialises the SQL data sources, including the precalculated lookup tables and loads in texture maps from image files. This data is accessed using dictionary lookups in the render.
The render part supports “slide-and-collide” collision detection, raycasting, lighting, pixel shading from texture maps and bit packing as the final step before outputting to the frame buffer:
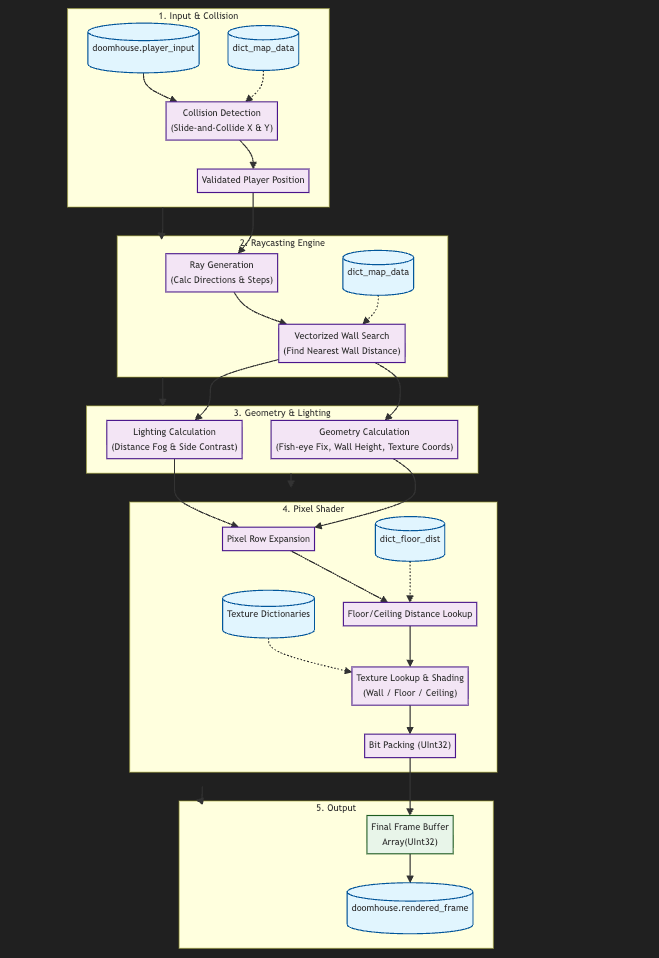
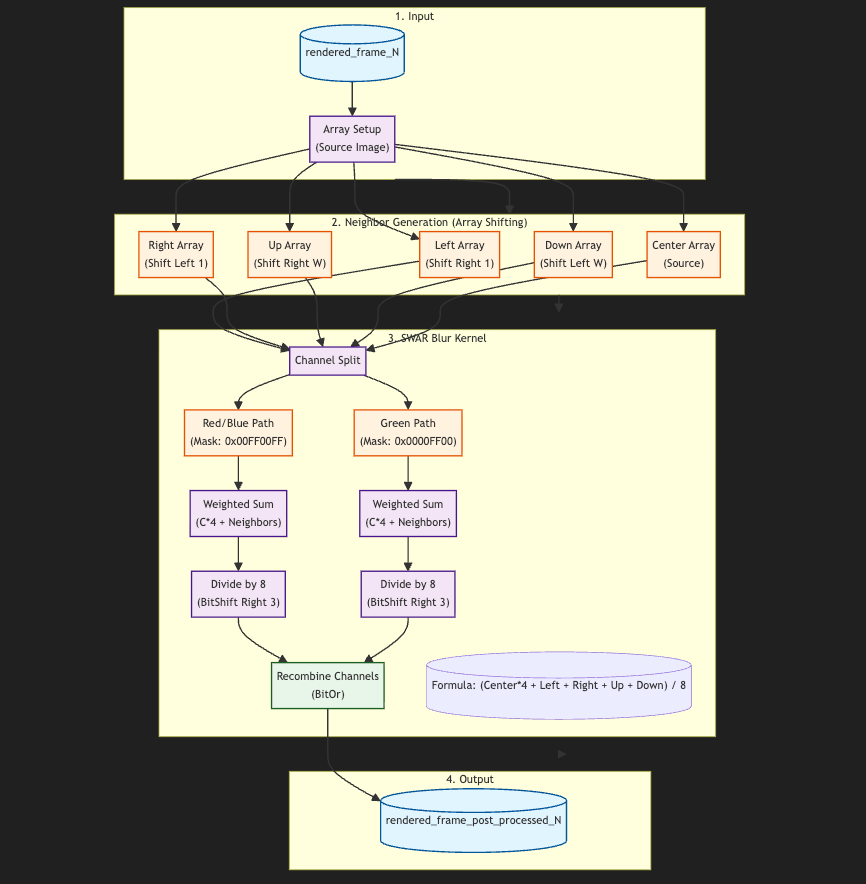
The rendered image is then post-processed to apply an anti-aliasing step using a SWAR blur kernel for improved visuals. The output is stored in the final frame buffer table:
How does this even work in SQL?
What I found most interesting, and learned the most from, was the models clever usage of ClickHouse’s array functions to make vectorized raycasting.
1. arrayMap: The “Loop” Replacement
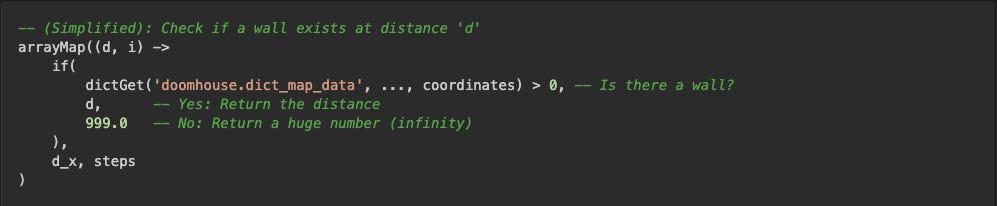
In a standard programming language, raycasting uses a while loop to step a ray forward until it hits a wall. Since SQL is declarative and lacks imperative loops, the model came up with using arrayMap to process all potential steps (vectorization).
Usage 1: Calculating Distances.The engine first generates a list of steps [1, 2, ... n] using range(1, RAY_STEPS). arrayMap then transforms these step indices into actual world distances for every potential grid intersection.

Usage 2: Checking for Walls. It is used again to check every calculated distance to see if a wall exists at that location.
2. arrayMin: Finding the First Hit
After arrayMap has checked all RAY_STEPS potential steps, we have an array that looks something like this: [999.0, 999.0, 4.5, 999.0, 8.2, ...].
999.0represents empty space.4.5is the first wall hit.8.2is a wall behind the first one.
arrayMin simply grabs the smallest number from this array, which corresponds to the closest wall the ray hit.

3. arraySort: Assembling the Framebuffer
ClickHouse processes data in parallel, so the pixels for the screen (640x480) are generated in a completely random order. To display the image correctly, the pixels must be reassembled into a linear sequence (Row 0, Row 1, etc.).

Breaking ClickHouse
During the development, the agents managed to write SQL that broke ClickHouse, but it was fixed quickly in version 26.1.1.562.
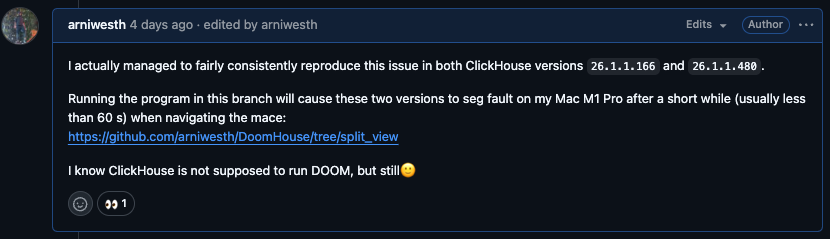
The program uses quite a few concepts (array functions, dictionaries, joins, memory engines, etc), and apparently, by running multiple renders in parallel, I consistently hit an issue related to inverse dictionary lookup, which is a feature that was introduced recently.
Costs
No blogpost on agentic coding should be without a cost breakdown. We can download the usage from OpenRouter as a CSV file and quickly query it in ClickHouse to get the total cost and token usage pr model used:

So the total cost was 40.05 USD, and the total token usage was 74.280.825.
Thoughts
Developing this way is, at least to me, a highly addictive experience. There is a certain element of gamification of the development experience going on here. Also, initially I had no idea what was possible wrt doing the rendering in ClickHouse SQL, so this is also a good example of what I call experimental coding, where the code evolves as capabilities become clear.
What I am missing in improving the Agentic development experience:
Analytics on token usage and a full log of the agent’s actions and input/output to the model. ClickHouse would be a great platform for this type of analytics, particularly due to the high compression ratios that can be achieved for logs.
And as a final remark, if you want to try breaking ClickHouse yourself, clone the repo here.